
Reservation list and reservation's own page
In Trail, you can manage all item reservations quickly and easily. Tracking, searching, and reviewing reservations is done from Reservations → All Reservations.
By default, reservation list shows active and upcoming reservations. Click a reservation’s title to view detailed information about it
Main Topics:
Reservation List and Search
At the top of the list, you’ll find tools to manage reservations efficiently:
- Search field – quickly search for reservations by title or reserver
- New Reservation – create a new reservation easily from the top right corner
- Export list to Excel – export basic reservation data to an Excel file
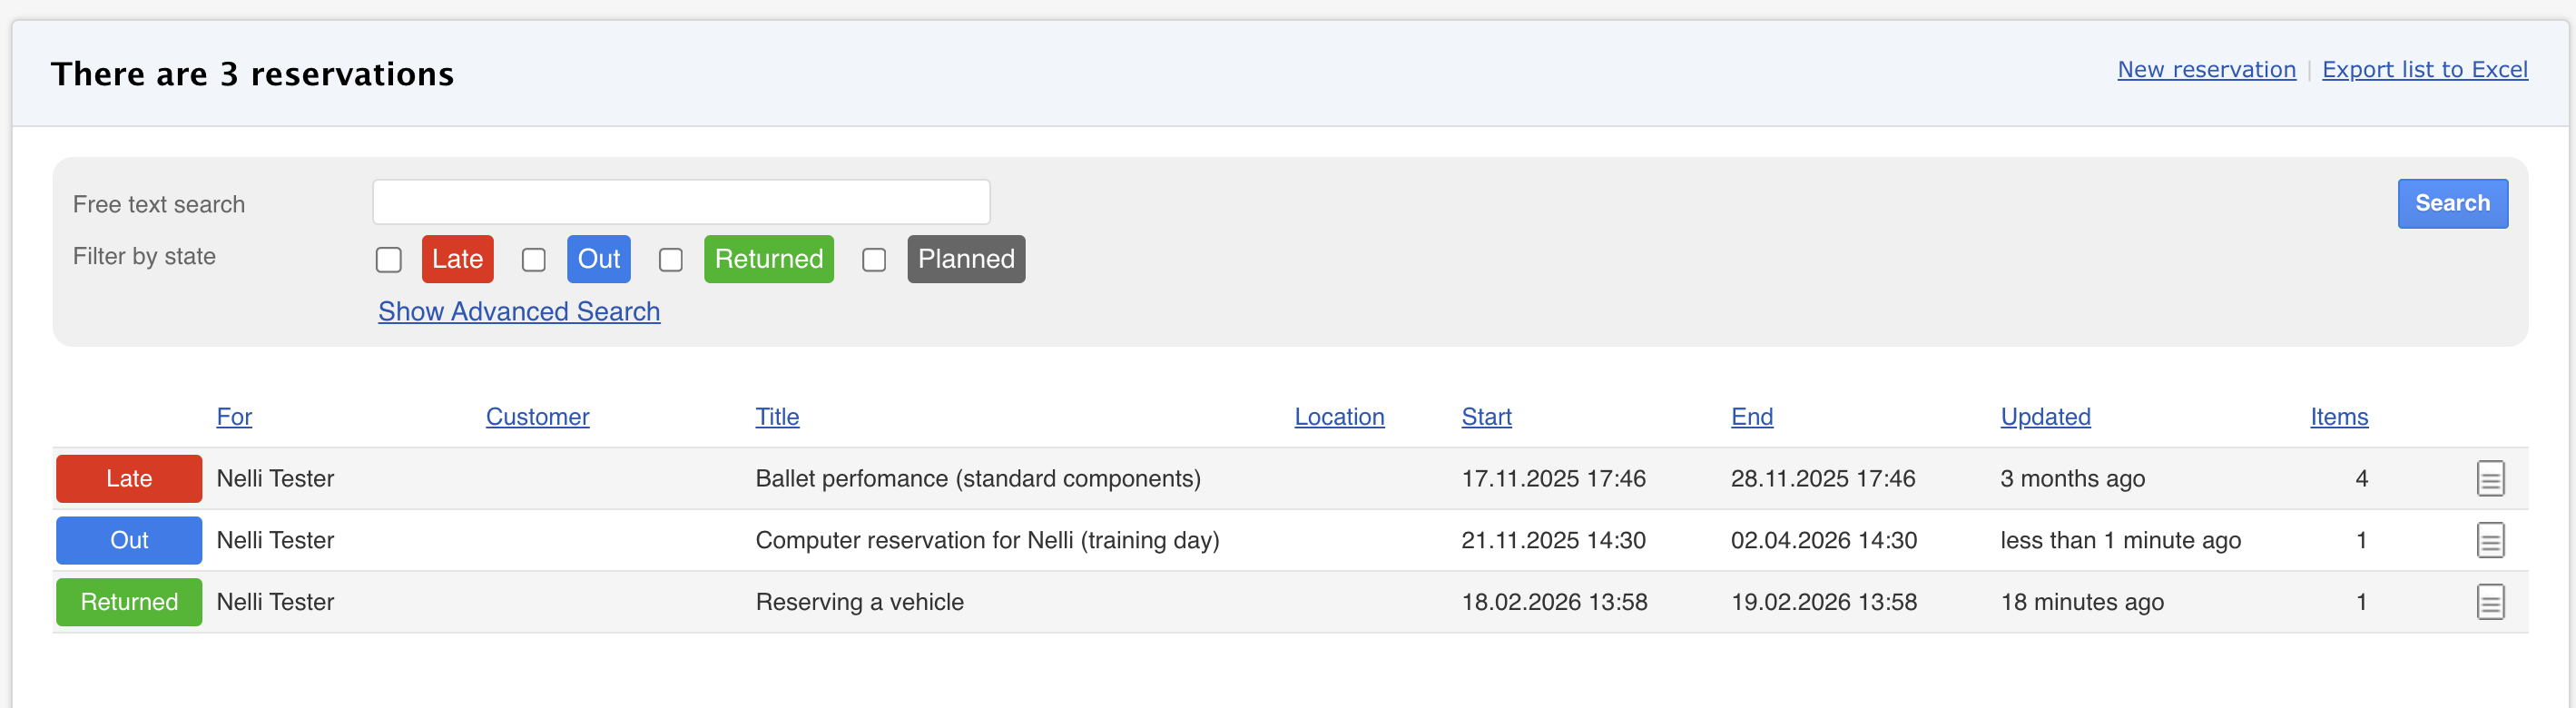
Reservations can be searched in multiple ways:
- Free text – search by reserver or title
- Show advanced search – filter by additional information, e.g., location or reservation dates
- Search past reservations – can be done in two ways:
- Filter by state – select “Returned”
- Advanced search → Active between dates – enter a date in the right-hand field to see all reservations that ended before this date
Reservation Status
Reservation status shows in one word and with a clear color code. Possible statuses:
| Planned ⚪ | Reservation created, but items not yet checked out |
| Out 🔵 | At least one item has been checked out |
| Returned 🟢 | All items in the reservation have been returned |
| Late 🔴 | Reservation end time passed and not all items returned |
| Acepted 🟢 |
Reservation accepted by user with editor rights Note: visible only if reservation acceptance settings is enabled |
| Rejected 🔴 |
Reservation rejected by user with editor rights Note: visible only if reservation acceptance settings is enabled |
| Requested 🔴 | Reservation includes models where available stock is exceeded. Visible only when the Subrentals feature is active |
Reservation's Own Page
The reservation detail page provides a comprehensive overview of a single reservation. From this page, you can see basic information, planned items, checked-out and returned items, and scan history.

Basic Information (Left Side)
- Status – reservation status (Planned, Checked out, Returned, Overdue)
- Start and End Time
- Duration – calculated automatically by Trail
- Equipment Value – combined value of all items
- Reserver Information – who has the items. Note: items can only be added from departments accessible to the reserver
- Rental Details – shown if rental functions are enabled
Action Buttons (Right Side)
- Read barcode – scan items in or out
- Reservations – shows planned quantities and which items are read out or returned
- Consumables – consumables can be added to a reservation. Select department and location first before scanning. Items are deducted from stock when scanned out. Consumables are not returned by default
- Reservation sets (optional) – create a plan using pre-defined sets of item models and quantities
- History information - what updates have been made, and which items have been read our and returned and when.
Equipment Value
Trail calculates an equipment value for every reservation. The value is based on the model’s renewal price, or the item's purchase price if no renewal price exists.
1. Renewal price available
Equipment value = model renewal price × quantity
| Scenario | Model renewal price | Quantity | Equipment value |
|---|---|---|---|
| User reserves 1 computer | 1000 € | 1 | 1000 € |
| User reserves 2 computers | 1000 € | 2 | 2000 € |
2. No renewal price
If the computer would not have renewal price, Trail uses the purchase price.
| Scenario | Purchase price | Renewal price | Equipment value |
|---|---|---|---|
| Model has no renewal price | 1200 € | – | 1200 € |
3. Item has content
If an item has content, the content’s value is included.
- In planned reservations → value is estimated (because at this point it is not clear will the used item have content or not).
- In read out reservations → value is exact.
- Note! If you add content items separately to a reservation, they are counted twice.
| Scenario | Computer renewal price | Content | Resulting value |
|---|---|---|---|
| Planned reservation for 1 computer | 1000 € | 2 computers where 1 has USB modem (30 €) attached | ~1015 € (estimate) |
| Planned reservation for 1 computers | 1000 € | 2 computers where both have USB modem (30 €) attached | 1030 € (estimate) |
| Read out with content | 1000 € | +30 € | 1030 € |
| Read out without content | 1000 € | none | 1000 € |
| Planned 1 computer and 1 USB modem | 1000 € | USB modem (30 €) (added separately) | 1045 € or 1060 € (depending how many computers have content) |
Note The equipment value is based on value situation of when the items have been added. If the values (for example model renewal price) changes after they have been scanned out, the equipment value is not updated automatically.
⭐ Trail Tips
- Use the 3-character rule in the search field: type at least 3 characters to see matching results
- To limit what reservations users see, Trail offers additional settings:
- Reservation calendar – restrict by department
- User group settings – reader right users see only their own reservations